Assignment 2
In this assignment we will be getting familiar with React!
Step 0 - Setup
Create a Next.js using our starter code with the following command:
yarn create next-app --typescript --example "https://github.com/cornell-dti/trends-fa22-starters/tree/main/a2" YOUR_DIR_NAME
Step 1 - Get Comfortable
Run yarn dev in the project directory to start the server and navigate to
localhost:3000 to see what the starter code gives you.
Look around the project code to see what it's all about.
- First peek with
pages/index.tsx- This is the homepage!
- You see that it imports a
Layoutcomponent fromcomponents/layout
- Look at
components/layout/Layout.tsx- This component surrounds the children between
NavbarandFootercomponents - Make sure understand how everything is put together
- This component surrounds the children between
Make sure to fill in all the TODOs in addition to the steps in this writeup!
Step 2 - Club Roster
You have been assigned to make a roster web page for your favorite club!
We will be taking advantage of the .map() function to display a list of data.
On your browser, navigate to the Club Roster link in the NavBar, which will
bring you to localhost:3000/roster. This page corresponds to the
pages/roster.tsx file in your project.
Notice that the page imports /components/roster/Roster.tsx - navigate to that
file to start working.
Here is everything you need to do to create your roster:
- Extend the
ClubMembertype with AT LEAST TWO other fields/attributes - Extend the
rosterDatalist with AT LEAST THREE total club members (you may remove the example if you wish) - Extend the
RosterItemcomponent to display the additional fields you've added toClubMember - In the
Rostercomponent, display the list of club members inrosterDatausing yourRosterItemcomponent
Step 3 - BRB Clicker
You played Cookie Clicker and want to make your version. Introducing BRB Clicker!
We will be taking advantage of various React hooks to introduce
interactivity and state into our web app. We will be mainly dealing with
useState and useEffect, but useRef is given in the starter code as well.
The game operates as follows:
- You start with 0 BRBs. You want more :)
- Clicking
Acquire BRBwill give you 1 BRB - Clicking
BuyunderHire Freshmanwill spend 10 BRBs but increase your passive income by 1 BRB per tick
We may be expanding upon this in another assignment, but for now we will only have 1 upgrade (hiring freshmen).
Your task is to fill in the unimplemented parts of the starter code in
components/game/Game.tsx to make this game work.
It'll look like this 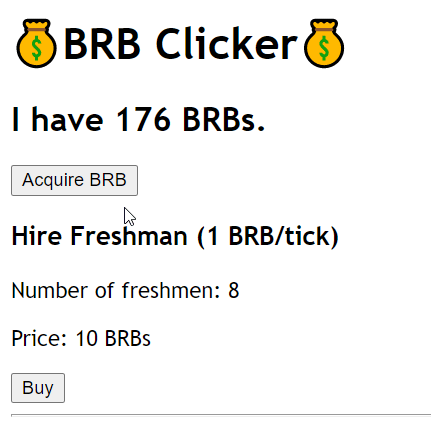
Hints
Take advantage of the TODOs placed around the code!
Remember that the second argument of useEffect dictates when this "effect"
triggers. A value of [] means the effect will only run once at the beginning.
A value of [a, b] will cause the effect to run every time either a OR b is
modified.
Remember that useState(init) can be called with an argument specifying the
initial value of the state.
Fun fact: you can parameterize the useState<Type>() call with the <Type>
notation to state the type of the state variable. However if you supply an
initial value, TypeScript will infer the type (unintuitively sometimes, so watch
out!) For example, useState<number>(0) is the same as useState(0).
Press F12 (in most browsers) to bring up your developer tools. Navigate to the
Console tab to look at the console output. You can place console.log() calls
in your code and monitor this console to help debug.
The onClick property of the button element fires whenever the button is
clicked. Make sure you are passing in a function to be called, rather than
the result of calling a function.
If in doubt, wrap it in an anonymous function: eg. () => console.log("hi") vs
console.log("hi")
Step 4 - Submission
Once you are done, please zip up everything in your project folder EXCEPT the
node_modules and .next folders.
Then submit to CMS!