Assignment 3
In this assignment we will be practicing conditional rendering and lifting state up!
Step 0 - Setup
Create a Next.js using our starter code with the following command:
yarn create next-app --typescript --example "https://github.com/cornell-dti/trends-fa22-starters/tree/main/a3" YOUR_DIR_NAME
Step 1 - Hit The Ground Running
As with A2, run yarn dev in the project directory to start the server and
navigate to localhost:3000 to see what the starter code gives you.
Here are the important files you'll be working with:
- React Components
components/game/Game.tsx- This is where our game state will live and be passed down from!
- Splits the UI into two sections, each of which is its own React component
components/game/ClickerSection.tsx- Displays the number of BRBs you have, as well as other stats
- Has a button that should give you BRBs when clicked
components/game/UpgradesSection.tsx- Displays a list of upgrades using the
UpgradeDisplaycomponent - Fairly simple - is just a wrapper around the upgrade list
- Displays a list of upgrades using the
components/game/UpgradeDisplay.tsx- Displays stats of a particular upgrade (purchased count, price, etc)
- Has a button that should buy the upgrade when clicked
- Other Files
data/index.ts- Where all your GAME DATA 🤑 is
- Make sure to add at least one more upgrade to your game
types/index.ts- Just has one type:
Upgrade - No need to change in this assignment
- Just has one type:
As always, make sure to fill in all the TODOs before submitting!
Step 2 - Dealing with Lifted State
In A2, we had the whole game all in one component. But now it's in pieces 😭
Here is a UML diagram that captures how the starter code is set up:
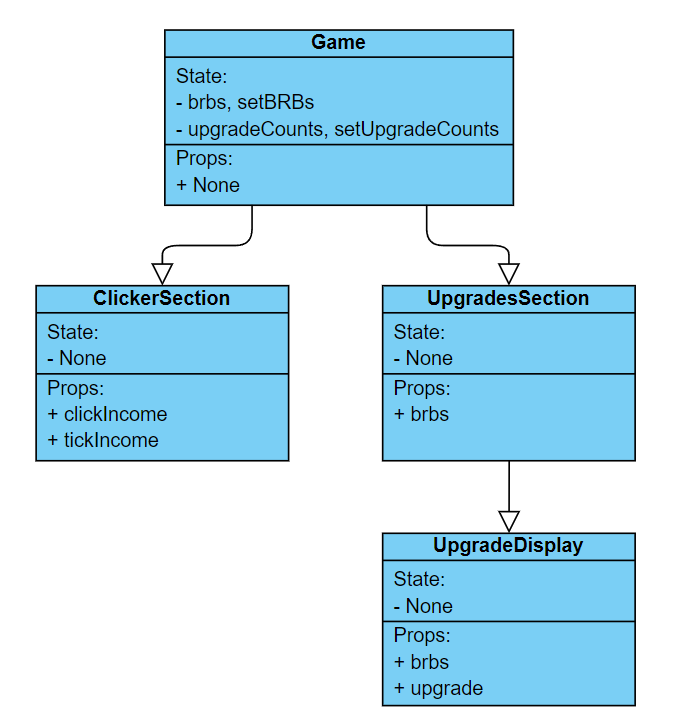
Game.tsx has all the lifted state, but it needs to be passed down! The starter
code is not complete, which means that your first task is to pass down the props
that the other components need.
Here are all the additional props that need to be passed down:
ClickerSectionbrbssetBRBs
UpgradesSectionsetBRBsupgradeCountssetUpgradeCounts
UpgradeDisplaysetBRBsupgradeCountssetUpgradeCounts
Remember that adding a required prop is a TWO-FOLD process:
- In the (child) "receiving component", add it to the
Propstype - In all (parent) "giving components", supply the prop in JSX (
<Component />)
FAQ for Step 2
What is the type of "setter" functions like setBRBs and setUpgradeCounts?
Best way to check a type is by hovering over the variable in your IDE!
If you hover over setBRBs, you will see Dispatch<SetStateAction<number>>
You will find that the type for the setter function for useState<T> will be
Dispatch<SetStateAction<T>> for some type T representing the state.
Should I always be passing down the state variable/setter function directly to child components?
You don't have to! We do it in most cases in this assignment for simplicity.
However, you can see that clickIncome and tickIncome is passed down to
ClickerSection as props. Since those two values are just a function of
upgradeCounts (covered in Step 3), you can pass down upgradeCounts as a prop
instead, and do all the calculation in ClickerSection instead of Game.
However(ever), in our assignment we calculate tickIncome in Game instead of
ClickerSection because the tick logic is in Game and relies on the value of
tickIncome.
TL;DR - Props do not have to mirror state in parent components, you should aim to design them in most understandable/practical way!
Why do the Props types have the readonly thing?
We like to add the readonly keyword to attributes in Props types to remind
ourselves that props are passed down and cannot be directly modified. If we try
to do so, we will be warned by TypeScript b/c we have specified it to be
readonly. This is an optional code style thing but we like it :)
Step 3 - Tracking Upgrades
In A2, we had only 1 upgrade you could buy. Now we can add as many upgrades as we want! However, how do we keep track of how many upgrades we've purchased?
If we have one upgrade, we can keep track of this using a single number. But
what if we have n number of upgrades? There are many ways to solve this, such
as with an array. However, we will be instead using the following for A3:
The Map class in JavaScript/TypeScript represents a mapping between a unique key and a value. See the MDN docs for more information on Map if you are unfamiliar.
In Game.tsx, we have a state variable called upgradeCounts of type
Map<Upgrade, number>. This means that the key is of type Upgrade and the
value is of number.
If we have an Upgrade in mind, we can check the corresponding mapped number,
which represents how many times that particular upgrade has been purchased.
Accessing upgradeCounts
We need the values inside upgradeCounts for several parts of the game.
In Game, several stats rely on upgradeCounts.
clickIncome is 1 + the total times purchased across all upgrade
categories. Buying any upgrade should increase clickIncome by 1.
tickIncome is the sum of your effective income for each upgrade
(incomePerTick * number of times it was purchased)
In UpgradesDisplay, we want to display the number of times the upgrade has
been purchased (purchasedCount)
We will also use this purchasedCount value to implement a feature in Step 4!
Hints For Accessing upgradeCounts
We can use upgradeCounts.get(upgrade) to retrieve the associated value for a
given upgrade.
We can use [...upgradeCounts.values()] to get a list of values in the Map.
We can use [...upgradeCounts.entries()] to get a list of [key, value] pairs in
the Map.
See MDN docs for more things you can do!
Modifying upgradeCounts
When we buy an upgrade, we want to increment the associated number in
upgradeCounts by 1.
This should happen in the buyUpgrade function in UpgradeDisplay.
Hints For Modifying upgradeCounts
Remember that you can do either setUpgradeCounts(newValue) or
setUpgradeCounts((oldValue) => newValue) to update your state.
To make a change to an existing Map, do the following
// This *modifies* the Map that upgradeCounts points to
// newValue points to the SAME Map as upgradeCounts
const newValue = upgradeCounts.set(key, newValue);
IMPORTANT Note that setUpgradeCounts may not behave as you expect when
working with object references. If you call setUpgradeCounts(newValue) where
newValue is the same reference as upgradeCounts, then this WILL NOT
trigger an update/rerender!
To get around this issue, do the following
const newValue: Map<Upgrade, number> = upgradeCounts;
setUpgradeCounts(newValue); // this is BAD
// Creates a copy of the map so that React knows that newValue is different
setUpgradeCounts(new Map(newValue)); // this is GOOD
Step 4 - Finishing Touches
We're done with the biggest part of the assignment, which is dealing with upgrades! Now let's add some smaller stuff to make the game cooler :)
Here is a list of features to add:
- In
Game, we normally show<h1>BRB Clicker</h1>as the page header.- If we've purchased at least one of every upgrade, then do the following:
- Replace the text with
💰BRB Clicker💰instead (withh1tags still) - Right under the header
h1tag, add a win message in aptag
- Replace the text with
- Refresh your memory on Conditional Rendering from Lecture 5 if you're stuck!
- If we've purchased at least one of every upgrade, then do the following:
- In
ClickerSection, make the "Acquire BRB" button work!- Each click should increase BRBs by the value of
clickIncome - This will be very similar to what you did in A2, using the
onClickprop
- Each click should increase BRBs by the value of
- In
UpgradeDisplay, we need to increase the price of an upgrade each time we purchase it.- In Cookie Clicker, the price increases by 15% every purchase.
- Let's yoink that! (Make sure to round up to the nearest integer)
- In
UpgradeDisplay, we want to disable the Buy button (make it greyed out and unclickable) if we don't have brbs to afford the next upgrade.<button />accepts a prop (likeonClick) calleddisabled, which takes abooleanthat decides whether the button is disabled or not.
Step 5 - Submission
Make sure you've completed all of the TODOs, including your name/netid in
Footer.tsx and the hours worked in index.tsx
Once you are done, please zip up everything in your project folder EXCEPT the
node_modules and .next folders.
Be extra careful with .next because it is a hidden folder, which will not show
up in Finder/File Explorer by default. Please find out how to show hidden
files/folders for your file browser of your choice.
Then submit to CMS!