Lecture 9
Final Project - Milestone 1 due 11/21 by 11:59pm
Final Project - Milestone 2 due 12/2 by 11:59pm
Final Project - Milestone 3 due 12/9 by 11:59pm
Vote for the Lecture 10 topic here by 11/24 11:59pm
Yarn Workspaces
Replacing our familiar workflow
Normally, to run both the backend and frontend, we have to do something like this:
cd backend
yarn install
yarn start  # start the backend

cd ../frontend
yarn install
yarn start  # start the frontend
We can make managing the frontend and backend easier by creating a package.json in our root directory and declaring a workspaces!
{
  "private": true,
  "workspaces": ["frontend", "backend"]
}
Hoisting package manager out to root
One advantage of doing this is that dependencies are installed at the root, so if both your frontend and backend use the same version of TypeScript, it is only installed once at the workspace root.
Another thing you may notice is that only one lockfile is generated and it is placed at the workspace root with package.json.
Having your package manager at your root also makes running scripts from both workspaces much simpler. To run the respective start script for the frontend or backend, you can
run yarn workspace frontend start or yarn workspace backend start
Local workspace as dependency
If there is code that you wish to be shared between both your frontend and backend, for example, you can also declare that as another workspace in your package.json
and include it in the respective frontend and backend package.json like so:
{
  "name": "frontend",
  "version": "1.0.0",
  "dependencies": {
    "typescript": "^4.1.2",
    "react": "^17.0.0",
    "helper-functions": "1.0.0"
  }
}
Why use workspaces?
- Yarn workspaces allows your dependencies to be linked together, making it easier to manage a monorepo
yarn installwill generate oneyarn.lockfor the whole project, and having one lockfile creates fewer conflicts and makes code reviews easier- Note: you should always commit and push
yarn.lockandpackage-lock.json
- Note: you should always commit and push
- Reduces redundancy in packages
- Including workspaces as dependencies makes it easier to test your utility functions locally before you publish them online
Yarn workspaces setup
We will be showing Yarn workspaces setup on our example Filterable Product Table App we've been working on throughout the semester. After lecture 8, we bridged the frontend and the backend together to fetch data from our API endpoints defined in backend/index.ts to show in the frontend UI.
We kept these two folders separate and we showed the old way of cd into each folder and running Yarn install. Now with workspaces we can manage the package from the root and directly run yarn install once to install all frontend and backend dependencies!
Root
To do this, our root package.json will define the workspaces. (Note: root means outside of both the frontend and backend folders, on that same level of the directory hierarchy.)
Most important lines here are 3-7 which define the workspaces and set private: true since workspaces can't be published.
{
  "name": "products-app",
  "private": true,
  "workspaces": ["backend", "frontend"],
  "version": "1.0.0",
  "main": "index.js",
  "license": "MIT"
}
Backend
Now our backend workspace will look like the following. I've omitted some of the dependencies part for brevity you can find the full file here
{
  "name": "backend",
  "version": "1.0.0",
  "private": true,
  "main": "index.js",
  "dependencies": {
    "cors": "^2.8.5",
    "express": "^4.17.1",
    "firebase-admin": "^10.0.0"
  }
  // dev dependencies...
}
Frontend
Our frontend workspace will also look like the following. The full file can also be found here
{
  {
  "name": "frontend",
  "version": "0.1.0",
  "private": true,
  "dependencies": {
    "@testing-library/jest-dom": "^5.11.4",
    "@testing-library/react": "^11.1.0",
    "@testing-library/user-event": "^12.1.10",
    "@types/jest": "^26.0.15",
    "@types/node": "^12.0.0",
    "@types/react": "^17.0.0",
    "@types/react-dom": "^17.0.0",
    "axios": "^0.24.0",
    "firebase": "^9.4.1",
    "react": "^17.0.2",
    "react-dom": "^17.0.2",
    "react-firebaseui": "^6.0.0",
    "react-scripts": "4.0.3",
    "typescript": "^4.1.2",
    "web-vitals": "^1.0.1"
  },
  "proxy": "http://localhost:8080",
  "scripts": {
    "start": "react-scripts start",
    "build": "react-scripts build",
    "test": "react-scripts test",
    "eject": "react-scripts eject"
  },
  // other config and browser dependencies
}
}
Profit!
Now we can profit from all our hardwork setting up by managing everything from the project root. In the root we can run:
yarn workspace frontend build to build our frontend application. This is equivalent to running react-scripts start based on frontend/package.json.
We can also run yarn workspace backend build to build our backend application. This is equivalent to running tsc -p tsconfig.json based on backend/package.json.
In general the syntax for running a script for a workspace is yarn workspace <workspace_name> <script_name>. Where <workspace_name>/package.json has a value for <script_name> in the scripts section.
We notice we have two build scripts in backend and frontend. yarn workspace run build will tell yarn to run build script in all workspaces that have them.
Of course, we can also run yarn install in the project root to install all the dependencies required in all of our workspaces. If there are duplicates, yarn will only install the dependency once.
Learn more!
Yarn workspaces is super cool and we just covered a subset of functionality. If you want to learn more check out these links:
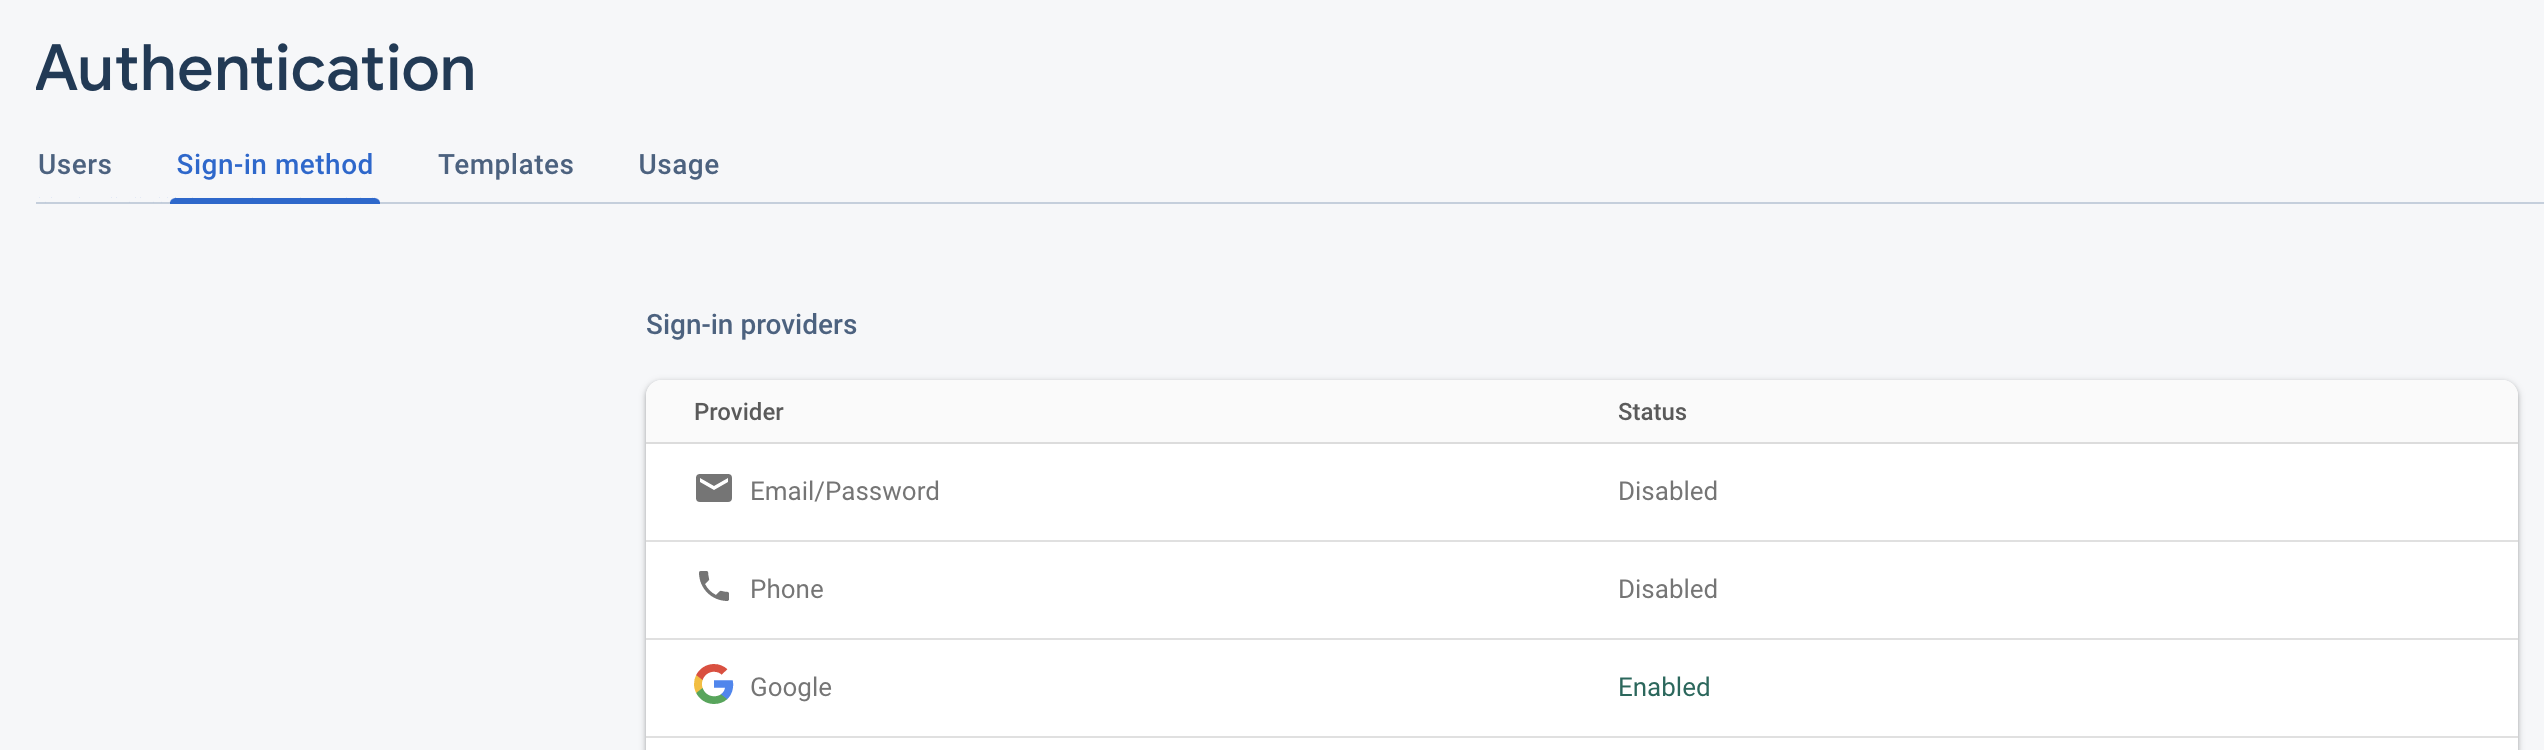
Authentication
One of the best parts about Firebase is you can use Sign in with Google/Facebook/GitHub/etc! This way you don't have to deal with usernames and passwords yourself!
Before writing any code, you need to setup Firebase Authentication first.
In your project's firebase console, click on the authentication icon below the settings icon:
![]()
Then click on the sign-in method tab and enable Google login by following the setup instructions:
We did a Live Coding Demo here based on the Products example from last week. I will include the files changed here.
To handle authentication we made a wrapper component Authenticated to handle all Authentication:
import React, { useState, useEffect } from 'react';
import 'firebase/auth';
import { initializeApp } from 'firebase/app';
import {
  User,
  GoogleAuthProvider,
  onAuthStateChanged,
  getAuth,
  signOut,
} from 'firebase/auth';
import FirebaseAuth from 'react-firebaseui/FirebaseAuth';

const firebaseConfig = {
  // put firebase config in here.
  // You can find the config in Project Settings > General
  // and choose the Config option in Firebase SDK snippet
};

const firebase = initializeApp(firebaseConfig);

const auth = getAuth(firebase);

type Props = {
  readonly children: React.ReactNode;
};

const Authenticated = ({ children }: Props) => {
  const [user, setUser] = useState<User | null>(null);

  const uiConfig = {
    signInFlow: 'popup',
    signInOptions: [GoogleAuthProvider.PROVIDER_ID],
  };

  useEffect(() => onAuthStateChanged(auth, setUser), []);

  return (
    <>
      {user ? (
        <>
          <h2>Hi, {user.displayName}!</h2>
          <button onClick={() => signOut(auth)}>Sign Out</button>
          {children}
        </>
      ) : (
        <FirebaseAuth uiConfig={uiConfig} firebaseAuth={auth} />
      )}
    </>
  );
};

export default Authenticated;
We then wrap our whole FilterableProductTable app in Authenticated.
import './App.css';
import Authenticated from './Authenticated';
import FilterableProductTable from './FilterableProductTable';

function App() {
  return (
    <div className="App">
      <Authenticated>
        <FilterableProductTable />
      </Authenticated>
    </div>
  );
}

export default App;
If the user is logged in, FilterableProductTable will show. Otherwise they will be asked to log in.
We then deployed this app on Firebase for the frontend and Heroku for the backend. Refer to the commands above.
tip
We recommend using Firebase's built-in support for Google Authentication since storing passwords securely is very hard (more details in the security section). Firebase also has support for many other accounts such as Facebook, GitHub, Microsoft, Apple, etc. Read more about Firebase Authentication here. If for whatever reason you really want to implement your own user accounts, Firebase can still help you store passwords securely. Read more here.
Security
Web app security is integral in a world where people have malicious intentions. As such, we advocate for at least these basic security measures.
1. Passwords
Do NOT store passwords in plain text in your database!!
If somehow there were a vulnerability in your database, the passwords of all of your users would be directly exposed to hackers. Moreover, many people reuse their passwords for some if not all other, so you could also compromise something like someone's banking credentials or emails.
While it is safer to store hashed passwords, it is very easy to do it incorrectly, which is why we teach firebase authentication!
2. Input Sanitization
Input sanitization 'cleanses' inputs so that they can not be used in unintended ways.
For example, it may seem reasonable to add every comment on a blog into a database entry like this:
“INSERT INTO 'comments' (comment) VALUES '” + user_input + “';”, but it is actually incredibly unsafe
if user_input were something like '; DROP TABLE comments;.
Luckily for us, React DOM escapes values embedded in JSX before rendering them by default, preventing injection attacks.
3. Don't Rely on Client Side Verification
In general you cannot assume your endpoint will only be used by your frontend.
Recall that we used Postman at the beginning of the semester to test Express endpoints. As such, it is always important to verify your inputs and authenticate your requests!
4. Separation of Privileges
Going hand-in-hand with the last point, when a request is made to your backend, make sure that the source of your request has the sufficient permissions to perform whatever action is being asked!
For example, if the OfficeHours app recieved a request to edit the times to someone's office hours, the backend would check that this person is indeed the TA who owns that OH and not a student.
Let's hack our app!
In the lecture we didn't have time to show you guys how we could hack our application. However, if you are interested you can do so by sending in bad unauthenticated input data.
We fixed the backend by using Firebase Admin's verifyIdToken function to check whether the user had logged in or not.
Backend
On the backend, we had the post endpoints check the idtoken in the request headers authorization.
app.post('/createProduct', async (req, res) => {
  const idToken = req.headers.authorization || '';
  try {
    await auth.verifyIdToken(idToken);
    const newProduct = req.body as Product;
    const addedProduct = await productsCollection.add(newProduct);
    res.send(addedProduct.id);
  } catch (error) {
    res.send('auth error');
  }
});
We call await auth.verifyIdToken(idToken) and only then do we allow the input to be saved. Otherwise, we log the error.
Frontend
Now when we send the request back, we need to send the idtoken with the request header. So in the createProduct method that called the POST endpoints above, we send call getAuth().currentUser?.getIdToken() to get the user's idtoken. Then we pass it in as a field to headers in the fetch. However, if the currentUser is undefined for some reason (what the ? catches). Everything else should be familiar from last lecture.
const createProduct = async () => {
  const newProduct = { name, price, stocked };
  if (!name || !price) {
    alert('Fields cannot be empty');
    return;
  }
  getAuth()
    .currentUser?.getIdToken()
    .then((idToken) =>
      fetch('/createProduct', {
        method: 'POST',
        headers: {
          'content-type': 'application/json',
          authorization: idToken,
        },
        body: JSON.stringify(newProduct),
      }),
    )
    .then((res) => res.text())
    .then((data) => {
      const newProductWithID = { ...newProduct, id: data };
      setProducts([...products, newProductWithID]);
    });
};
Security Best Practices
There is a lot more we could've done in terms of security here.
- We should send back error messages to the user about why requests are failing instead of just doing
console.log()since the user won't see that. This would be bad user experience since they don't have feedback about why things aren't working. - We should also do input validation on the backend to ensure we are getting our expected inputs. What if we aren't passing an object that looks like:
{
  "category": string
  "price": string
  "stocked": boolean
  "name": string
}
Deployment
To deploy your web application means to put it on a web server so others can access it via the internet. We will deploy both our frontend and backend on Heroku. There are a variety of services you can use for deployment including Firebase, Amazon AWS, Microsoft Azure, etc, but we decided to show you Heroku deployment since it is easier and requires less setup.
We will be taking our filterable product table app we have been building throughout the course and deploying it to a remote server. To deploy your own app (for final project for example), you can follow the same steps usually.
Deployment Setup
Backend
index.ts
To deploy to Heroku we need some additional setup. In the frontend folder, when you run yarn build, you will get a build directory containing all the optimized, bundled frontend React code ready to be pushed to a remote server. We will include the line app.use(express.static(path.join(__dirname, '../frontend/build'))); to do this. (Note: this requires us to import path from 'path';)
We will also be calling upon our express app to use CORS to allow cross origin requests. If your backend requests are being blocked be of some CORS cross origin policy issue you probably forgot to include the app.use(cors()); line. (Note: this requires us to import cors from 'cors';)
The beginning of your backend/index.ts should look like the below. Note the CORS line (line 7) and express static serving line (line 8) we described above and the relevant import statements.
import express from 'express';
import cors from 'cors';
import path from 'path';
import { db, auth } from './firebase-config';

const app = express();
app.use(cors());
app.use(express.static(path.join(__dirname, '../../frontend/build')));
app.use(express.json());

const port = process.env.PORT || 8080;

type Product = {
  price: string;
  stocked: boolean;
  name: string;
};

type ProductWithID = Product & {
  id: string;
};

const productsCollection = db.collection('products');

app.get('/getProducts', async (_, res) => {
  const products = await productsCollection.get();
  res.json(
    products.docs.map((doc): ProductWithID => {
      const product = doc.data() as Product;
      return { ...product, id: doc.id };
    }),
  );
});

// other routes...
app.listen(port, () => console.log(`Example app listening on port ${port}!`));
note
Notice we are having app.listen listen for either process.env.PORT or port 8080. Previously, we hardcoded 8080 for this parameter. process.env.PORT will be defined by Heroku and we want the app to listen for requests on that port in the deployed site.
We can load the FIREBASE_PRIVATE_KEY from the environment variable instead of having it in plaintext inside the firebase-adminsdk.json file. This is the service account JSON we were working with with Firebase! By removing the private key from our file, we can publish this code on a public repository without exposing our private key.
{
  "type": "service_account",
  // ...stuff
  "private_key": "",
  // ...more stuff
}
To run our app locally we create a .env file inside the frontend folder that contains the actual value for the private key.
Make sure that the .env file is inside the backend folder!
FIREBASE_PRIVATE_KEY=-----BEGIN PRIVATE KEY-----\n...\n-----END PRIVATE KEY-----\n
However, our .env file does not get included with the repository, since it has sensitive information.
In Heroku there is a section called "Config Vars" in the settings which you can use to set the environment variables for deployment.

note
How do we stop the .env file from being included with the repository?
Sometimes we don't want a local file to be part of the repository. Each version
control system has its own way of excluding files. We are using git, which
uses the .gitignore file. You will most often see a .gitignore file in the
top-level directory of a repository, but they can exist in any child directory
as well.
To specify what to ignore, we add lines to a .gitingore file containing a
pattern (similar to globs). When a file or folder name matches a pattern inside
the .gitignore file, it gets excluded from the repository.
For example, we would add a line containing .env to ignore all files (and
folders) named .env. Of course, you could do a lot more complex stuff with the
patterns you have at your disposal!
Learn more about the .gitignore file here.
Find the .gitignore file for the lecture demo here.
Feel free to use the following code as-is to load the private key from the environment.
import * as admin from 'firebase-admin';
import { readFileSync } from 'fs';
import { config } from 'dotenv';

config();

const serviceAccountPath = './firebase-adminsdk.json';

const hydrateServiceAccount = (
  serviceAccountPath: string,
): admin.ServiceAccount => {
  const serviceAccount = JSON.parse(
    readFileSync(serviceAccountPath).toString(),
  );
  const privateKey = process.env.FIREBASE_PRIVATE_KEY?.replace(/\\n/g, '\n');
  return { ...serviceAccount, privateKey };
};

admin.initializeApp({
  credential: admin.credential.cert(hydrateServiceAccount(serviceAccountPath)),
});

const db = admin.firestore();
const auth = admin.auth();

export { db, auth };
note
firebase-config.ts contains the hydrateServiceAccount function which reads the value from the environment variable, loads up the rest of the firebase-adminsdk json, and combines them together to get a full service account object which you can initialize the Firebase admin with.
Frontend
No further setup required in our frontend folder.
Root
package.json
Our root package.json will look like the following. We are using yarn workspaces as described above and the heroku-postbuild script will build both workspaces to prep them for push to remote server. (We discussed yarn workspaces run build above) heroku-postbuild is a special command recognized by Heroku to allow you to customize the build process.
{
  "name": "products-app",
  "version": "1.0.0",
  "private": true,
  "scripts": {
    "heroku-postbuild": "yarn workspaces run build"
  },
  "workspaces": ["backend", "frontend"],
  "license": "MIT",
  "devDependencies": {
    "heroku": "^7.59.1"
  },
  "resolutions": {
    "@oclif/color": "0.1.0"
  }
}
note
The root package.json can have dependencies and yarn will install them with yarn install just like everything else. You will just need to run yarn add -D -W <pkg_name> since just using yarn add will show a warning message asking if you are sure about adding a dependency to the root. We add Heroku in this case to help with deployment!
note
Normally, we don't need the resolution section, but the Heroku CLI is bugged at the time of writing, so we have to add this to our root package.json and then yarn install again as a workaround.
Read more about heroku-postbuild here.
Procfile
We will also have Procfile that tells Heroku what script to run to start the application. In this case we will be using the backend node index.js to start the backend listening for requests and serving the frontend assets from the frontend/build folder.
web: yarn workspace backend start
Read more about the Heroku Procfile here.
Deploy time
We will now show the series of commands to deploy to Heroku. We will be using Heroku Git to deploy.
yarn add -D -W heroku
git init
git add .
git commit -m "COMMIT MESSAGE"
yarn heroku login
yarn heroku create <optional project name>
git push heroku master
(optional) yarn heroku open
note
If you run into any bugs when running the code above (probably yarn heroku create <optional project name>), you can create a new project through Heroku's website www.heroku.com
Visiting the URL should take you to the same application you had locally. Now you can share that link with your friends so they can visit your website too!
note
If you run into issues that the app isn't authorized to use authentication, go to your Firebase project on firebase.google.com > Go to Console > [your project] > Authentication [on sidebar] > Sign-in Method > Authorized domains > Add Domain and enter the URL of your deployed site.
info
In your final submission of your final project, we want you to follow these steps to deploy your app to Heroku and place the link in the README.md. If you prefer to deploy on another platform feel free but we do not guarantee we know how to debug any issues that come up.